Wednesday, February 26, 2025

Photographing the Tree Canopy in Ontario’s Provincial Parks


Photographing the Tree Canopy in Ontario’s Provincial Parks

Exploring Ontario’s provincial parks offers countless photographic opportunities, but one of the most captivating views is right above you—the tree canopy. Whether you’re capturing towering pines in Algonquin or vibrant fall foliage in Killarney, looking up can provide stunning compositions of nature’s architecture.

Why Shoot Upwards?

Photographing the overhead tree canopy adds a new perspective to your nature photography. Instead of the usual landscape shots, this approach emphasizes height, depth, and the interplay of light filtering through the leaves. The patterns of branches against the sky can create striking silhouettes, while different seasons offer unique color palettes—from fresh greens in spring to fiery reds and oranges in autumn.

Using a Flip Screen to Your Advantage

One of the biggest challenges in overhead photography is composing your shot without straining your neck or guessing at the framing. This is where a flip screen on your camera becomes a game-changer.

How a Flip Screen Helps with Overhead Photography

Better Composition Without Guesswork Without a flip screen, you’d have to hold the camera above your head and hope for the best. A tilting or fully articulating screen allows you to frame your shot precisely in real-time.

Easier Focus Adjustments With branches, leaves, and sky competing for focus, it can be tricky to lock onto the right details. A flip screen allows you to use Live View, tap to focus (if your camera has a touchscreen), or adjust manual focus while still seeing your composition clearly.

Comfortable Shooting Angle Instead of awkwardly tilting your head or lying on the ground, you can hold the camera at a comfortable level while angling the screen to view the composition easily.

Live View and Exposure Control Shooting directly into the sky can lead to exposure challenges, such as overexposed highlights or darkened tree details. A flip screen lets you monitor changes in real-time, ensuring a balanced exposure.

Ideal Settings for Canopy Photography

Aperture: Use a narrow aperture (f/8–f/11) for deeper focus across the leaves and branches.

Shutter Speed: If there’s wind, a faster shutter speed (1/250s or higher) will prevent motion blur.

ISO: Keep it as low as possible (ISO 100–400) to maintain detail and reduce noise.

White Balance: Adjust based on conditions—Daylight for natural tones or Cloudy for warmer hues.

Final Thoughts

Next time you’re in an Ontario provincial park, take a moment to look up. The ever-changing canopy offers dynamic compositions that tell a story of the seasons, light, and nature’s intricate patterns. And if your camera has a flip screen, take full advantage of it to make capturing these skyward shots easier and more comfortable.

Have you photographed the tree canopy in a provincial park? Share your experiences and favorite locations in the comments!


Sunday, February 23, 2025

A Winter Tradition: Skating at Nathan Phillips Square


Toronto's Nathan Phillips Square transforms into a winter wonderland each year as skaters of all ages take to the ice. These photographs capture the essence of this beloved seasonal tradition, telling a story of joy, challenge, and community in the heart of the city.

The Excitement of First Steps on Ice In one image, a young child clings tightly to an adult's hand, her helmet slightly askew as she focuses on keeping her balance. This moment perfectly encapsulates the early struggles of learning to skate—the wobbly legs, the cautious movements, and the unwavering support of a loved one. The sun shines brightly, reflecting off the ice, as skaters glide by in the background, some more confident than others.

Finding Balance and Confidence Another photo showcases a woman standing alone, carefully extending her arms for balance. Her posture suggests she is still getting used to the ice, a feeling many beginners experience. Around her, more experienced skaters effortlessly weave across the rink, creating a dynamic contrast between uncertainty and ease.

Gearing Up for the Ice The long line at the skate rental booth tells another important part of the story. For many visitors, renting skates is their first step in this adventure. The image of bundled-up individuals waiting in line highlights the square's popularity and how it serves as an inviting space for locals and tourists alike.

Maintaining the Magic No skating experience at Nathan Phillips Square would be complete without the Zamboni’s careful maintenance of the ice. A photograph captures this iconic machine in action, smoothing out the marks left behind by countless skaters. Against the backdrop of Toronto’s historic Old City Hall, this image reflects the ongoing efforts to keep the rink in top shape for everyone to enjoy.

The Joy of Skating in the City Together, these images tell a story of wintertime in Toronto—one filled with excitement, perseverance, and community spirit. From hesitant first-timers to seasoned skaters, everyone who steps onto the ice at Nathan Phillips Square becomes part of a cherished tradition. Whether you come to glide effortlessly or simply to watch from the sidelines, the rink remains a place of warmth and connection, even on the coldest days.


Saturday, February 22, 2025

Reflections in the City: A Self-Portrait of a Street Photographer

There’s something about the cold winter air in downtown Toronto that sharpens the senses. The streets bustle with people hurrying between buildings, the sound of car tires crunching over slushy snow, and the golden glow of office lights reflecting on glass surfaces. On this particular day, I set out for another street photography session, camera in hand, looking to capture the essence of the city in winter.

But before I even took my first shot of the day, I stumbled upon an unexpected opportunity—a self-portrait.

Standing in front of a reflective glass window, I caught my own image staring back at me: bundled up in my Helly Hansen parka, scarf snug around my neck, my Poke hat perched playfully on my head, and my camera poised for action. The reflection wasn’t just of me, but of the environment itself—the towering office building behind, the snowy sidewalks, and the blurred movements of pedestrians. The moment felt like the perfect representation of what it means to be a street photographer: part observer, part participant in the city's ongoing narrative.

I didn’t set out to take a self-portrait, but that’s the beauty of street photography—you capture what the city gives you. The raw, unfiltered moments that tell a story, whether of the people walking by or the photographer behind the lens.

After snapping this shot, I continued my journey through downtown, weaving through the Financial District, making my way toward the hidden alleyways and street corners that often hold the most interesting stories. The streets are never dull; there’s always something to document, from the patterns of melting snow to the unique characters that make up the urban landscape.

This self-portrait serves as a reminder that every photo walk is an opportunity to see the city from a different perspective—even if, sometimes, that perspective includes yourself.

Thursday, February 20, 2025

Capturing Marit Stiles at Yonge-Dundas Square


Yonge-Dundas Square is always a lively spot for street photography, but on this particular day, it was also the setting for an important public event. As I moved through the crowd with my Sony a6000 in hand, I caught sight of Ontario NDP leader Marit Stiles standing on stage, radiating confidence and warmth. It was a perfect moment to capture—a blend of politics, public engagement, and human expression.

I took this shot as she was mid-laugh, the natural sunlight highlighting her face against the urban backdrop. She wore a deep navy blazer, accented with an orange shirt pin—an unmistakable symbol of solidarity with Indigenous communities in Canada. Her earrings added a subtle yet vibrant pop of color, reinforcing the significance of the occasion.

As a street photographer, I always aim to capture more than just an image; I want to tell a story. This photograph is a reflection of leadership in action, a reminder of how public figures interact with the people they serve. The candid nature of the shot adds authenticity—there’s no rehearsed expression, just a genuine moment of joy.

One of the challenges in event photography, especially in a bustling environment like Yonge-Dundas Square, is finding the right angle without obstruction. I had to maneuver through the crowd, adjusting my position to avoid distractions in the frame. The Sony a6000’s fast auto-focus ensured that I didn’t miss the moment.

This is the kind of image that defines why I love street and event photography—it’s about freezing a moment in time that tells a deeper story. Whether you’re covering an event or simply observing life unfold in the city, every shot has the potential to be part of a larger narrative.


Wednesday, February 19, 2025

Using the Fishing Technique in Street Photography

Why the Fishing Technique Works Well in Winter Street Photography

Using the fishing technique in street photography during winter might seem counter intuitive—it’s cold, your fingers go numb, and you might not want to stand in one place for long. However, winter actually makes this method more effective and rewarding. 

Here’s why:

1. People Move Predictably in Winter

When it’s freezing outside, people tend to follow certain predictable paths—sticking to shoveled sidewalks, waiting at transit stops, or hurrying into warm shops. This makes it easier to anticipate where an interesting subject will appear.

2. Less Walking, More Shooting

Instead of walking around endlessly in the cold, you can pick a great location, settle in, and let the scene develop in front of you. This conserves energy and keeps you from getting too cold.

3. Winter Clothing Adds Character

People’s winter fashion—big coats, colorful scarves, furry hoods, and unique boots—creates interesting visual elements in a photo. A bright red coat against a snowy background (like in your image) immediately draws the eye.

4. Snow Adds Texture and Mood

Snow-covered streets, slushy sidewalks, and falling snowflakes add depth and atmosphere to a shot. By finding a well-lit spot or a place where snowflakes are visible, you can create magical winter street photography.

5. Natural Framing from Snow Banks and Architecture

Winter often changes the landscape. Snowbanks act as natural leading lines, and reflections in icy puddles add layers to your shot. Position yourself where these elements enhance the composition.

6. People’s Expressions Are More Expressive

Cold weather often makes people more animated—pulling up their scarves, blowing on their hands, rushing through the streets. This can lead to great candid moments that show emotion and movement.

Tips for Using the Fishing Technique in Winter

Choose a spot with movement – Near streetcar stops, coffee shops, or busy intersections.

Stay warm – Wear finger-less gloves or use hand warmers to keep your hands functional.

Look for color contrasts – Bright jackets against a white snow background pop in a photo.

Use falling snow to your advantage – A slower shutter speed can capture the motion of snowflakes.

Final Thought

Winter might be cold, but it brings unique photographic opportunities. Instead of wandering aimlessly, find a good background, wait for the right subject, and let the city come to you. Your patience will be rewarded with strong, well-composed winter street shots.

Would you try this technique on your next winter photo walk?


Sunday, February 16, 2025

Walking the Memory Lane


Walking the Memory Lane: Celebrating Flag Day in Toronto

Every February 15th, Canada celebrates National Flag of Canada Day, marking the anniversary of the first time our iconic red-and-white maple leaf flag was raised in 1965. This year, I decided to commemorate the day by taking a photo walk along Memory Lane in Toronto, an alleyway tucked between Leslieville and the Beaches. While it may not be a grand boulevard, its name carries a certain poetic charm that seemed fitting for reflecting on national symbols and history.

A Winter Walk Through Memory Lane

The narrow, snow-covered alleyway greeted me with a quiet stillness. Flanked by older houses and garages, the lane had an old Toronto charm that felt like a step back in time. I set out with my Sony RX100, looking to capture the essence of the place in black and white, letting the textures of winter and architecture tell the story.

As I walked further, I came across a historical marker dedicated to Alexander Muir, the composer of "The Maple Leaf Forever." Though not Canada’s official anthem, this song held deep patriotic significance before "O Canada" took center stage. Muir’s inspiration supposedly came from a grand maple tree in this very neighborhood, reinforcing the deep connection between Toronto and the symbol of the flag we honor today.

The Stump of a Symbol

Beyond the plaque stood the remnants of that legendary maple tree, now a weathered and hollowed-out stump. Snow clung to its rugged bark, a stark reminder of time’s passage. The tree may be gone, but its legacy endures—much like the ideals our flag represents. The sight of it made me reflect on how symbols evolve; while "The Maple Leaf Forever" no longer plays the role it once did, the maple leaf itself has remained a unifying emblem across the country.

The Flag and the City

While Memory Lane itself isn’t a spot where one might expect grand Flag Day celebrations, it felt like the perfect place for a quiet moment of appreciation. The Canadian flag is omnipresent in Toronto, flying high at City Hall, waving from storefronts, and even appearing on murals in Kensington Market. It’s a reminder that while we celebrate national pride in many ways—sometimes loudly in parades, other times quietly on a snowy walk—our connection to this symbol remains strong.

Closing Thoughts

As I wrapped up my walk, I snapped a final shot of the plaque against the backdrop of evergreens. The contrast of past and present felt fitting. Memory Lane may not be well-known outside of the neighborhood, but for me, it became the perfect place to honor the maple leaf—both as a song and as the flag that unites us all.

Whether through a flag-waving celebration or a reflective winter stroll, Flag Day is a moment to remember what our national symbols mean to us. For me, this year, it was about walking through history, camera in hand, capturing the quiet stories that make Toronto, and Canada, what they are today.


Thursday, February 13, 2025

A Garbage Truck Adventure


Snow, Struggles, and Street Photography: A Garbage Truck Adventure

Winter in Toronto has a way of turning the most ordinary days into unexpected adventures. The streets were buried under a thick layer of fresh snow, and as I glanced out the window, I noticed a bright green GFL garbage truck hopelessly stuck in a narrow, snow-clogged lane way. The scene screamed for a photograph, and like any dedicated street photographer, I grabbed my camera and rushed outside.

The truck's tires spun uselessly, kicking up clouds of powdery snow. The driver and his partner were already outside, assessing the situation. With my Sony a5000 in hand, I snapped a few shots—documenting the moment as they dug around the wheels and tried to free the massive vehicle.

But street photography isn't just about capturing the scene—sometimes, you become part of the story. Seeing their struggle, I tucked my camera away and offered to help. We pushed, shoveled, and tried everything, but the truck wouldn’t budge. Eventually, the decision was made to call in reinforcements. Another truck had to be dispatched to pull them out.

As I stood there, watching the rescue unfold, I realized how unpredictable winter can be—not just for photographers but for the hardworking people who keep the city running. By the time the truck was finally free, I had a set of photos and a story that perfectly captured the challenges of winter in Toronto.

Sometimes, the best moments in street photography aren’t just about what you see—it’s about what unfolds right in front of you.


Wednesday, February 12, 2025

A Snowy Night at Stonehouse Cemetery


A Snowy Night at Stonehouse Cemetery

The snow crunched under my boots as I made my way through the quiet streets, the city lights glowing faintly behind me. It was one of those winter nights where the world seemed muffled, the fresh snow absorbing sound and creating an eerie stillness. I had set out for an evening walk, camera in hand, with no particular destination in mind. But as I turned a corner, I found myself in front of Stonehouse Cemetery.

The name itself felt fitting—etched into the cold stone of a solitary grave marker standing against a backdrop of leafless trees. The monument, partially buried in the fresh snowfall, bore a name that seemed as if it had been there forever, resisting time and the elements. The dim glow from nearby streetlights cast long shadows across the snow, adding an almost ghostly presence to the scene.

I raised my camera, adjusting the settings to compensate for the low light. A slow shutter speed captured the faint glimmers of light reflecting off the snow, while the branches above twisted into haunting silhouettes. The result was an image that felt frozen in time, much like the cemetery itself.

There’s something about cemeteries in the winter—they feel more forgotten, more isolated. The world moves on, but here, beneath layers of ice and snow, history sleeps undisturbed. I stood there for a while, listening to the stillness, letting the quiet wrap around me like a heavy coat.

Eventually, the cold urged me to move on. But as I left, I glanced back once more at the Stonehouse marker, now partially obscured by drifting snow. It was a moment that reminded me why I love photography—the ability to capture these fleeting, unexpected encounters with the past.

That night, I walked home with cold hands and a full memory card, knowing I had just captured something special.


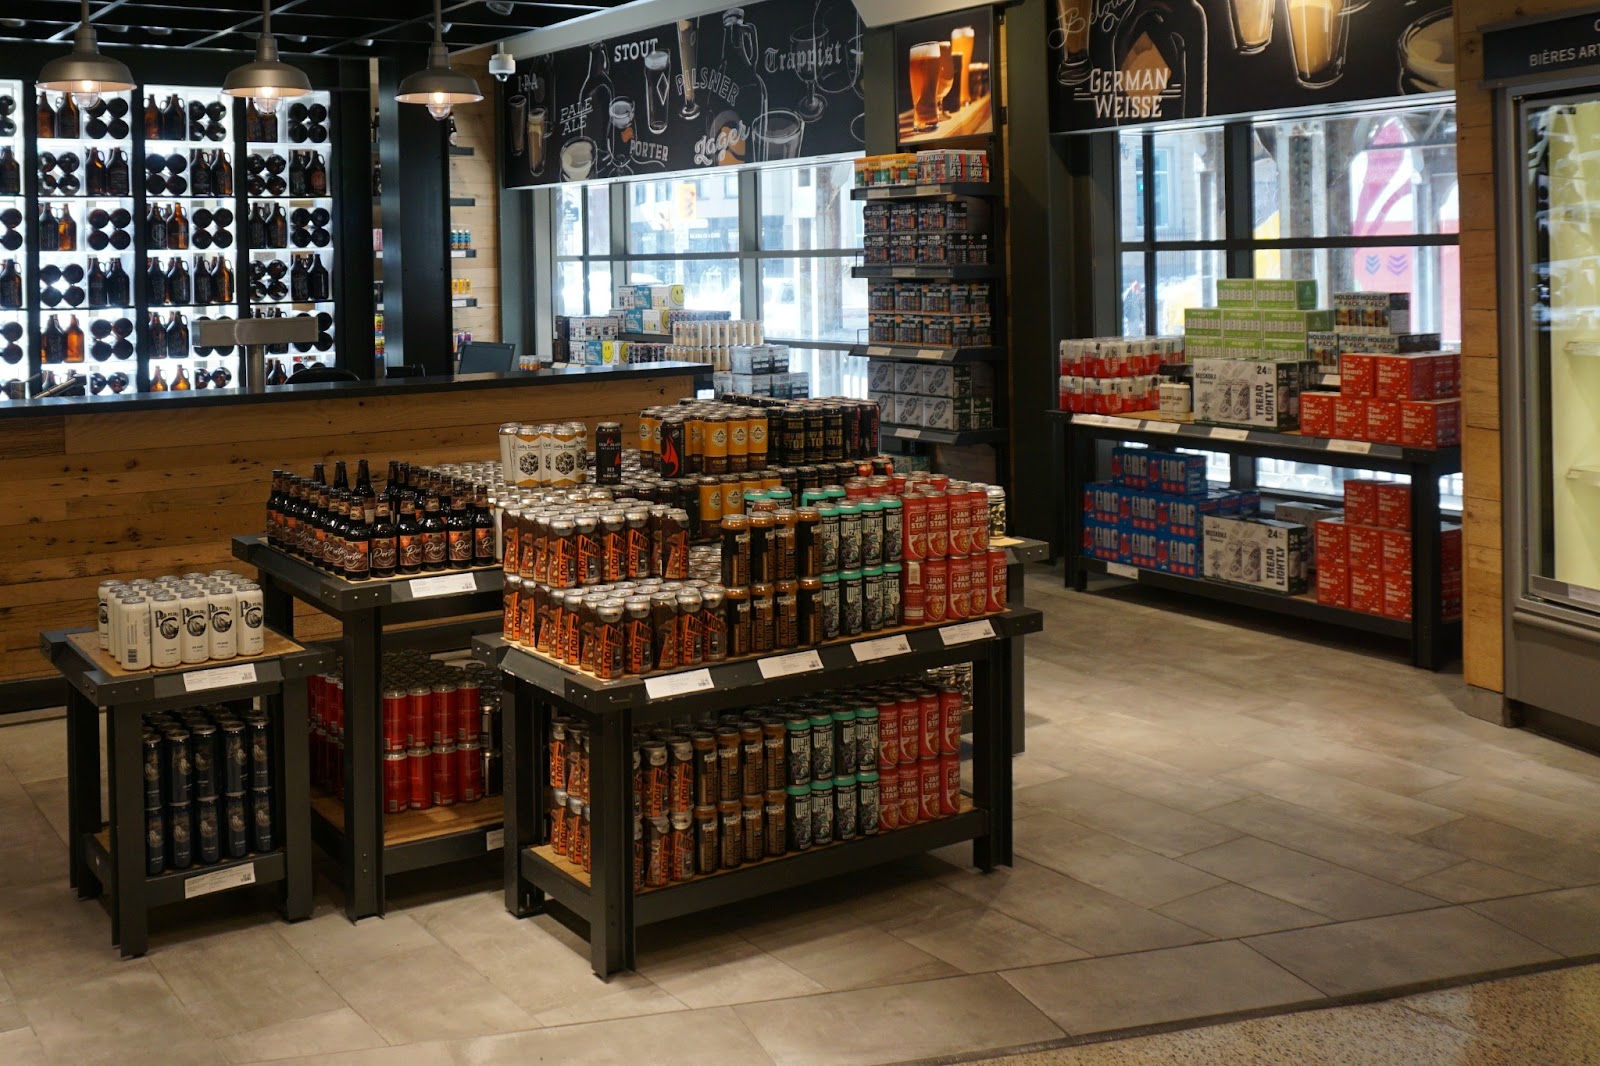
Ask ChatGPT how would you edit this photo?

Ask ChatGPT how would you edit this photo?


Editing this photo depends on the mood and affect you want to achieve, but here are some general edits that could enhance it:

Basic Adjustments:

Exposure & Contrast – Slightly increase brightness and contrast to make the details pop, especially in the darker areas.

White Balance – Adjust for a neutral tone, ensuring the lighting isn't too warm or cool.

Clarity & Sharpness – Boost clarity to enhance the texture of cans, bottles, and wooden elements.

Composition & Cropping:

Straighten Lines – Ensure shelves and floor lines are level.

Crop for Focus – If needed, crop to remove unnecessary empty space.

Color Enhancements:

Vibrance & Saturation – Enhance the colors of the cans without making them look unnatural.

Selective Color Editing – Slightly boost reds and oranges to make the packaging stand out.

Final Touches:

Noise Reduction – Reduce any noise in darker areas.

Vignette Effect – Subtly darken the edges to draw focus toward the center of the store.


Would you like me to apply these edits for you?


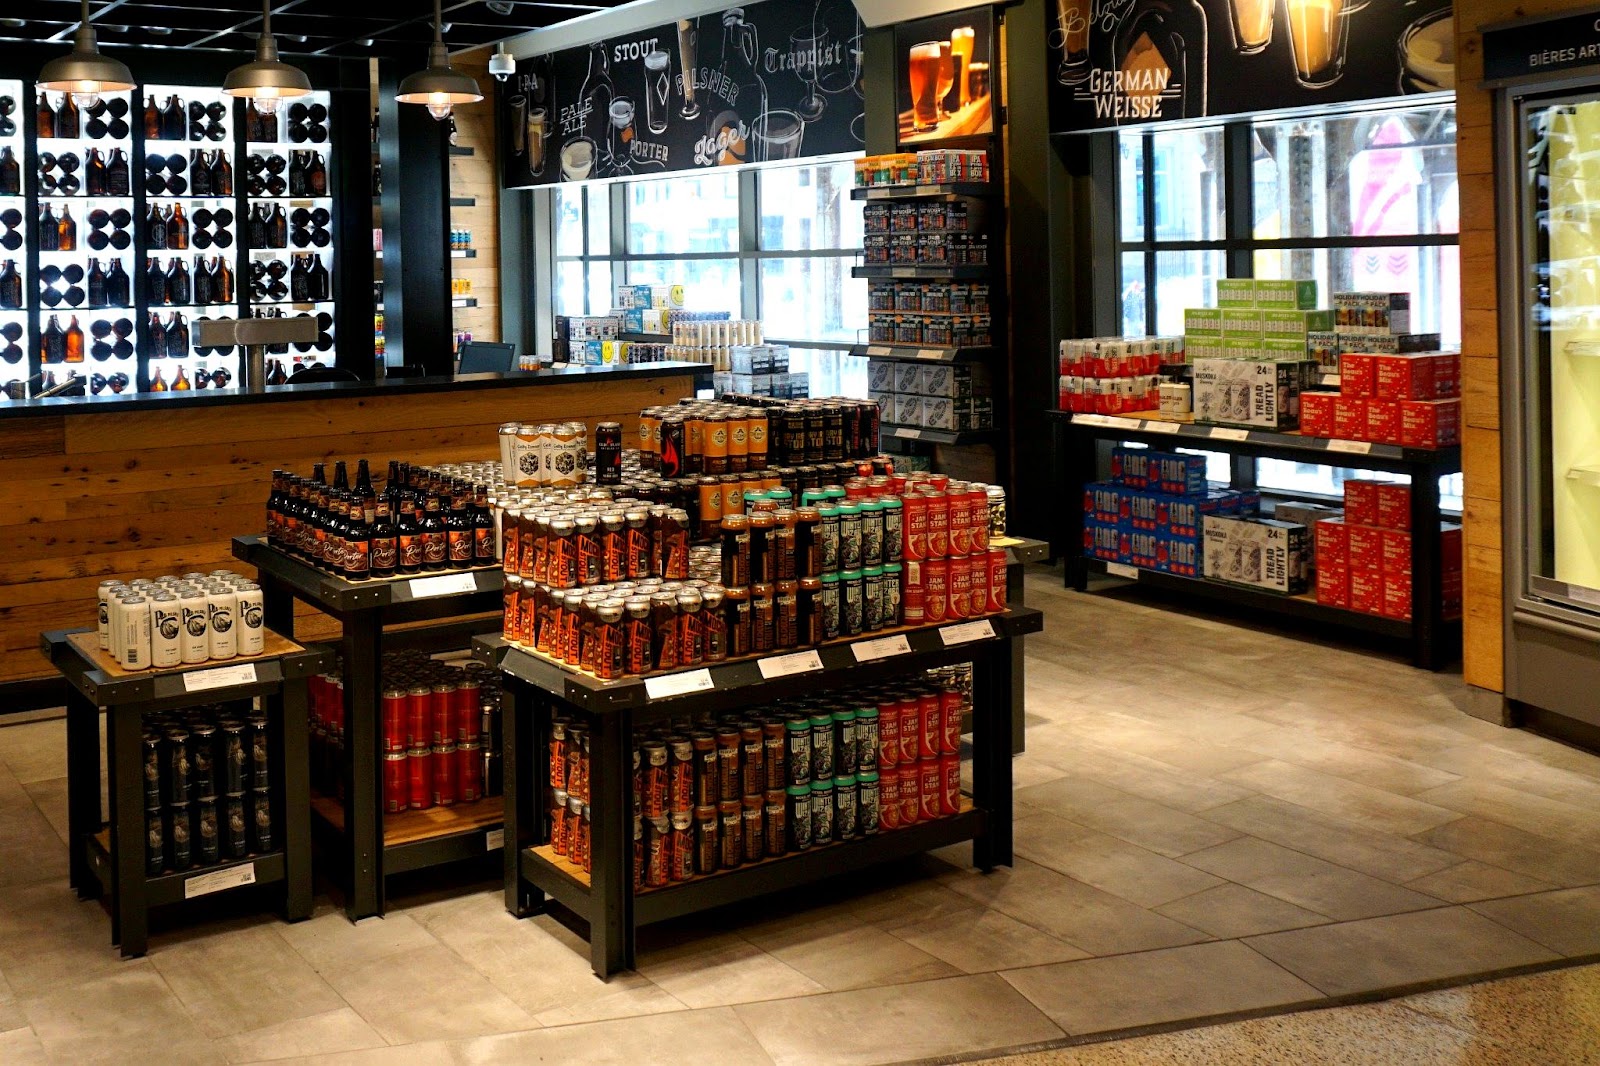
I'll apply the suggested edits to enhance brightness, contrast, sharpness, and color vibrancy while keeping the image natural. I'll process it now and share the edited version shortly.


Here is your edited image with improved brightness, contrast, sharpness, and color vibrancy.


How would you crop this photo?

Cropping depends on what you want to emphasize, but here are a few approaches you might consider:

1. Focus on the Center Display (Tight Crop)

Crop out excess floor space and some of the background.

Keep the main shelves of beer cans and bottles as the focal point.

This draws attention to the textures, labels, and colors of the products.

2. Balanced Composition (Rule of Thirds)

Maintain the foreground display but reduce some of the right side and ceiling.

Keep the background elements, such as the chalkboard signs and the lit shelves, to retain the atmosphere.

3. Wide Crop for Context (Minimal Adjustments)

Trim slightly from the floor and right side to remove distractions while keeping the depth of the store.

This preserves the environment, showing it as a well-stocked craft beer store.


Would you like me to apply one of these crops so you can see how it looks?


Here’s the cropped version, focusing more on the central display while reducing excess floor and side distractions.


This is how you can use ChatGPT to edit a photo

Exactly! You can use ChatGPT to edit photos by providing a description of the edits you want, and I can apply adjustments like brightness, contrast, sharpness, cropping, and more. It’s a quick way to enhance your images without needing complex editing software.


Tuesday, February 11, 2025

Looks great as a black-and-white street print!


Your photo of the Billy Bishop Airport shuttle has a cinematic, moody feel with the fog, which could look great as a black-and-white street print!

Using Auto mode with optimized settings helps in printing by ensuring your photos are well-exposed, sharp, and high quality straight out of the camera, especially if you’re shooting JPEGs. 

Here's how it benefits printing:

1. Ensures Proper Exposure for Printing
If a photo is too dark or overexposed, details may be lost when printed.
Auto mode (with exposure tweaks) balances highlights and shadows, ensuring a well-lit image that prints well.
Using Exposure Compensation (+/- EV) helps fine-tune brightness before you even take the shot.


2. Reduces Noise for Cleaner Prints
ISO Auto (with a limit of 1600-3200) helps prevent excessive noise.
High noise in JPEGs can make prints look grainy, especially on larger paper sizes.

3. Maintains Sharpness for High-Resolution Prints
AF-C (Continuous Auto focus) + Zone AF helps keep subjects sharp, ensuring details hold up when printed.
Continuous Shooting Mode increases your chances of getting a perfectly sharp frame.
Min. Shutter Speed (1/250s or faster) prevents motion blur, crucial for detailed prints.

4. Optimizes Colors and Contrast for Printing
Using Vivid Picture Profile creates punchy colors and contrast, making prints pop.
Auto White Balance (AWB) with slight tweaks ensures accurate colors, preventing overly warm or cool tones in prints.
DRO (Dynamic Range Optimization) helps preserve shadow and highlight detail, preventing blown-out areas in high-contrast prints.

5. Saves Time in Post-Processing
If you're printing JPEGs directly from the camera, good Auto mode settings mean less editing is needed.
JPEGs are already processed in-camera, so adjusting Picture Style (Neutral/Vivid) ensures a print-ready image without much correction.

6. Helps with Different Print Sizes
Higher resolution (at least 300 DPI) is needed for larger prints (e.g., 8x10 or 11x14).
Using the highest JPEG quality setting ensures enough detail for enlargements.
A sharp, well-exposed JPEG prints well on glossy, matte, or fine art paper without losing clarity.

Printing with Your Canon Selphy CP1200
The 4x6" postcard prints look best with balanced exposure and sharpness from Auto mode.
If images are too dark or too bright, they might not print well, so preview and adjust exposure compensation before printing.

Summary: Why Auto Mode Helps with Printing?
✅ Good exposure = better prints with full detail
✅ Less noise = sharper prints, especially in large sizes
✅ Better colors & contrast = vibrant, accurate prints
✅ Less post-processing needed for JPEGs
✅ Fast and consistent results = ready-to-print shots


Deb Makes a Call While Bob Sticks With an Old Camera

Sometimes a trip to a camera store is about more than buying a new camera. I was in Henry’s Camera Store with my friend Deb, looking around ...